The goal of a corrosion study is to know the corrosivity of the soil at the depth where infrastructure will be installed. Soil corrosivity can change dramatically per depth and location.
Deciding on the correct amount of due diligence in evaluating a site can be a mystery to investors and developers who are not themselves experts in corrosion or familiar with the cost of future corrosion failures and construction defect lawsuits.
To help our clients avoid being a penny-wise but pound-foolish, we share the following information from previous experience with post-tension contractors, concrete suppliers, structural engineers, and utility companies.
We normally collect soil samples at every acre or every 5th lot of a site plan. Collecting in this grid pattern allows us to identify hotspots at a site and isolate expensive corrosion control recommendations to only the hot spot sites. Our clients have told us that this saves them $5,000 per lot often which is significantly greater than the cost of the corrosion study itself. Project X can collect the soil samples or receive them from your geotechnical engineer. Project X can provide this quote when you send site information.
We test soils for 8 different factors which affect the corrosion rates of general construction materials such as steel, copper, brass, galvanized steel, concrete, iron, stainless steels, and aluminum. With this information, you’ll know the situation for each material you’ll bury and we provide you with corrosion control recommendations for each material.
Every material has its weakness. Aluminums and galvanized/zinc coatings do not survive well in very alkaline or very acidic pH environments. Copper and brasses do not survive well in high nitrate or ammonia environments. Steels and iron do not survive well in low soil resistivity and high chloride environments. High chloride environments can even overcome and attack steel encased in normally protective concrete. Concrete does not survive well in high sulfate environments. And nothing survives well in high sulfide and low redox potential environments with corrosive bacteria. This is why Project X tests for these 8 factors to determine a soil’s corrosivity towards various construction materials and wish geotechnical engineers would do so too.
It should not be forgotten that import soil should also be tested for all factors to avoid making your site more corrosive than it was to begin with.
It only takes a pinch of salt to a gallon of soil to throw your sample into a high chloride situation. Do not mix soils.
Three soil samples (400g) in zip lock bags fit nicely in a small $7 USPOST Priority Mail Flat Rate box which can arrive next day if mailed early. GSO is also almost as inexpensive as USPost if delivering from West Coast States.
Recommendations for Collecting Representative Soil Samples
The goal is to have a soil sample from the depth and location that the infrastructure will be installed. We recommend testing a 1/4 gallon (eg. Soda Can size~ 400g or sandwich bag) soil sample per acre with a minimum of 3 samples for small lots. Zip lock bags are great for collection. For residential developments, we recommend testing every 5th lot for corrosion series to avoid future construction defect surprises. If one lot pops up much more corrosive than all others, we would recommend collecting more samples from the lots surrounding the problem lot to determine if the peak is isolated to it.
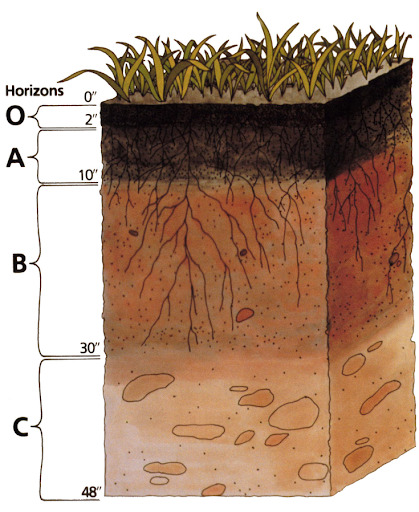
If this is for evaluating corrosion towards piles, concrete, and underground utilities, then we need samples from depths of 1 foot (most important for piles and concrete), 3 foot (for underground utilities and grounding wires), and 10 ft (for piles, very expansive soils, sewage, vaults, and storm drains), and ground water table information. If using helical anchors, we want to collect soil samples from the depth of the bottom of the anchor. The goal is to have a soil sample from the depth and location that the infrastructure will be installed. With all of this information, we can be aware of the soil corrosivity at various strata for all materials thus providing the most accurate engineering information possible. For pipelines such as water mains, we recommend collecting soil samples from pipe depth at every 1,000 ft of pipe alignment or wenner 4 pin tests of 2, 5, 10, X …, (X+5) to depth of pipe spacings.
Collecting water samples
Samples should be collected in sterile bottles. In a pinch, buy a distilled water bottle, empty the bottle and use for water collection. The sample should be shipped in a cooler and tested as soon as possible.
Conclusion
At Project X Corrosion Engineering, we specialize in testing soil and water corrosivity, providing corrosion control recommendations, investigating causes of corrosion, building inspection, cathodic protection design, corrosion control, and failure analysis. We help clients determine why they have a corrosion problem in the first place and what they can do to avoid corrosion problems in the future. We do not sell products or perform construction. We provide unbiased recommendations requiring the least amount of maintenance and cost. Customer service and reasonable turn around times are our priority.
Doing your corrosion homework can save you expensive headaches in the future. Digging up a water main pipe leak in a grass location plus repair typically costs $15,000. You can imagine what it costs to fix slabs, corroding rebar in slabs, or other difficult access infrastructure.
Our lab rates are online to help you build your proposal. https://projectxcorrosion.com/lab-rates/
Do not hesitate to call us for any questions